
Welcome to the second part of our series on using artificial light in food photography. In the previous article, we explored how to achieve the sought-after natural light look with just one light and a softbox. If you haven't read it yet, take a moment to catch up and join us. In this installment, we'll focus on the food photography lighting setup, revealing how you can create two distinct lighting looks with just one light source and softbox.

Why Mastering Multiple Lighting Setups is Essential
Learning different food photography lighting setups has several benefits. First and foremost, it enhances your skills as a photographer. Additionally, it adds diversity to your photos, allowing you to select the best lighting approach based on the type of food you're shooting and the desired mood.
Read more: Decoding IP Ratings for LED Strip Lighting
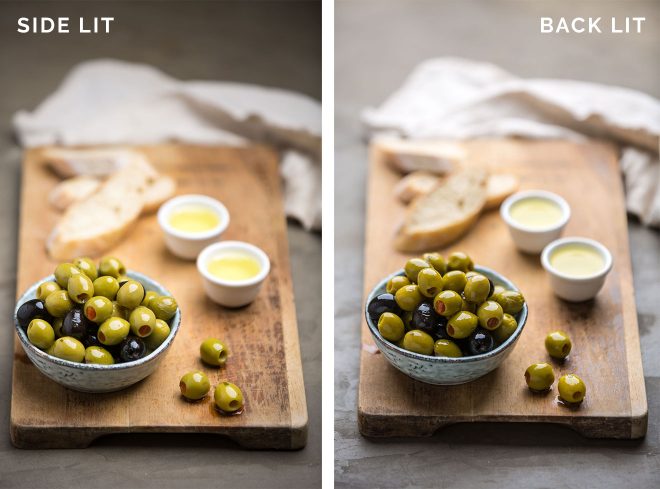
Certain dishes may call for a bright and side-lit appearance, while others may require a backlit setup to highlight their unique qualities. Whether you're shooting for your own blog or working on a client project, versatility in lighting will greatly enhance your work.
If you're unsure where to start with your continuous light kit, we've prepared a free PDF guide to help you get started.
Embracing the Learning Curve
It's important to remember that achieving perfect results with artificial light takes time and practice. Just as it takes time to master natural light, so too does it take time to become proficient with artificial light. So, don't be discouraged if your initial attempts don't meet your expectations. Persevere and keep experimenting.
In Part 1, I mentioned the equipment I use: a PixaPro LED200D mk II continuous light (or the Godox SL-200 LED for those in the US) and a 120cm octagonal softbox with double diffusion. This setup allows me to recreate the beautiful natural light flooding effect that comes from shooting next to a window. The added benefit is that I have complete control over the brightness, color, and direction, enabling me to create the perfect look for each shot.
In this article, I'll demonstrate how you can effortlessly create both a side-lit and a backlit look using just one light and softbox. If you prefer a visual guide, check out the video below!
Read more: How to Choose the Perfect LED Strip Lights for Your Desk
Back Lighting: Emphasizing the Highlights
Backlighting is an excellent technique to accentuate the specular highlights on shiny foods. It gives them a delightful glow, as demonstrated by the olives in the image above.
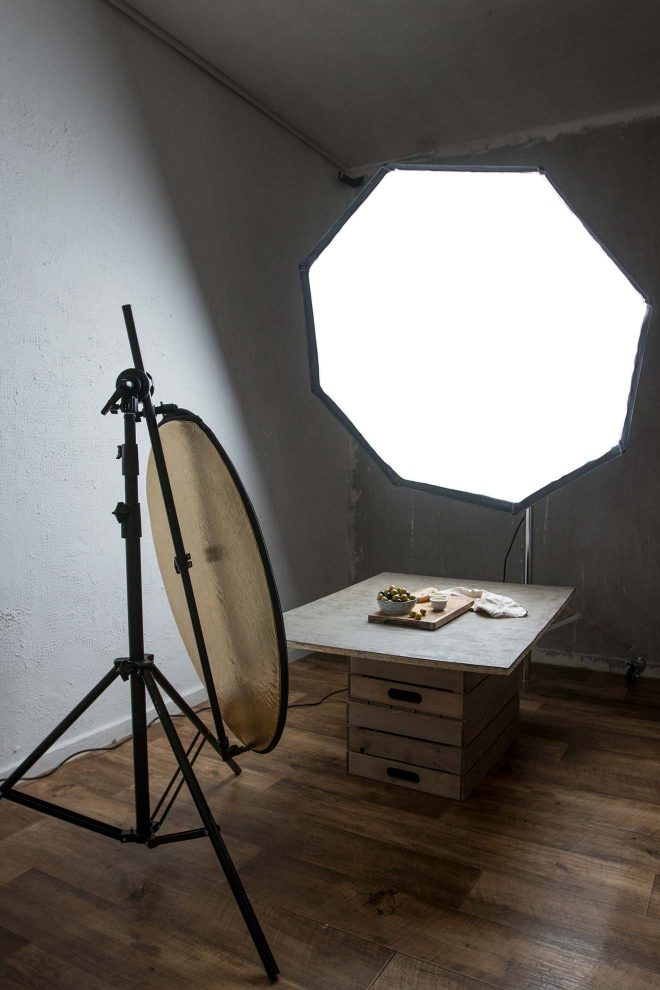
To achieve this effect, position the softbox behind the food, slightly elevated and angled downward. Be careful not to have the light directly visible in your shot, as the angles play a crucial role in achieving the desired effect.
It's important to use a white or silver reflector when backlighting. Since the front of your subject is facing away from the light source, without a reflector, the back of your scene may become overexposed if you expose the front of your food properly. This will result in an undesirable "blown out" look in your backlit shots.
Read more: How to Brighten Your Kitchen with Under Cabinet Lighting
To avoid this, place the reflector at the front of your set and angle it toward your food, allowing the light to bounce directly onto the front of the subject. If you have a spare light stand with a reflector arm, it can help hold the reflector in the perfect position while you capture the shot.
Side Lighting: Versatility at Its Finest
Side lighting is a versatile approach that works well in various situations. It is a valuable technique to have in your repertoire.
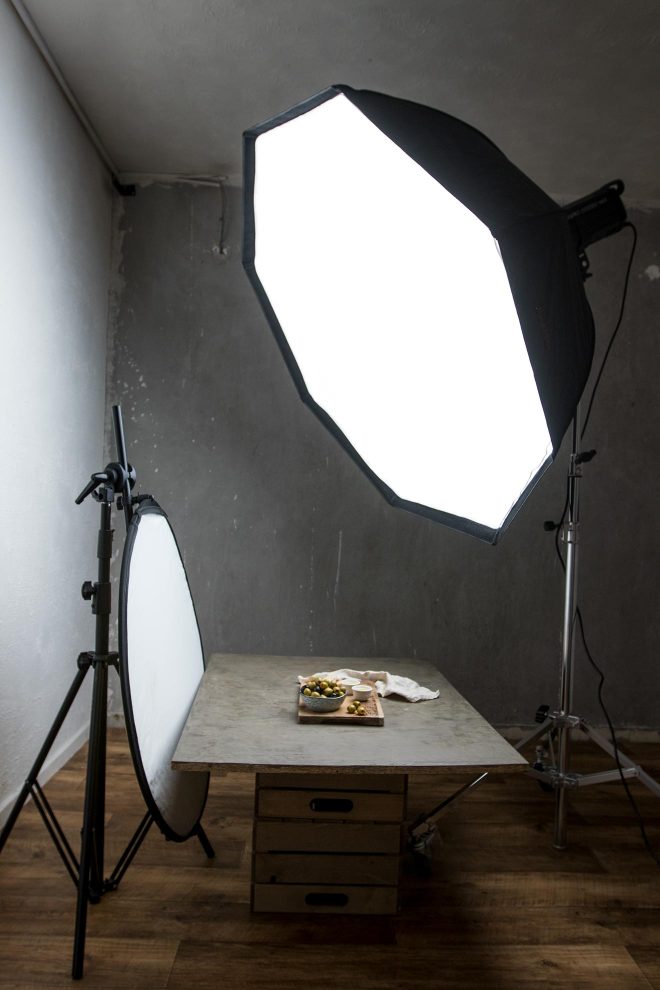
To create a side-lit shot, position the light on a slight diagonal to the food. This will give the shadows direction and depth. Additionally, raise the light above the set and angle it downward slightly.
When setting up your scene, experiment with the direction of the light. The direction of the shadows in a side-lit shot significantly impacts the final photo's appearance. Depending on the angle you're shooting from, different directions may yield different results. For a top-down shot, placing the light higher up and pointing it down onto the scene might be ideal. For a straight-on shot, you may prefer a lower light position to create longer and more directional shadows.
In this shot, I'll place a reflector directly opposite the light to fill the shadows slightly, resulting in a light and bright look. If you're aiming for a darker and moodier aesthetic, where shadows play a significant role in creating contrast, you can omit the reflector or even use a black fill card to absorb more light and emphasize the shadows.
Frequently Asked Questions
Q: Do you use artificial light in your food photography?
Yes, I do. Artificial light is a valuable tool that allows me to have greater control over the lighting conditions and create consistent results.
Q: What kind of lighting setup would you like to recreate but are struggling with?
If you're struggling with a particular lighting setup or want to achieve a specific look, leave a comment below, and I'll be happy to help you find a solution.
Please note that this post is not sponsored. Pixapro kindly provided me with the light and softbox free of charge. However, all opinions expressed are my own, and I wholeheartedly believe in the equipment I use for almost all my food shoots.
Now it's your turn to master artificial light in food photography!


